Guides
Can HomeKit and Siri Control SmartThings?

Smart light bulbs and a smart television are usually the first smart home upgrades. Of course, that’s not the end of the story. More and more high-tech gadgets are added to your home. Keeping track of how to operate everything might be overwhelming. One technology that may centrally manage your smart home’s many components is Samsung’s SmartThings platform.
Samsung SmartThings allows you to integrate various smart devices into a unified system. Even if the devices are from different manufacturers, you can still utilize voice commands, automate tasks, and set up routines.
You can integrate Google Assistant with Samsung SmartThings, for instance. Doing so will allow you to use your voice to operate your smart home gadgets. In addition, you may link your SmartThings with Amazon Alexa to accomplish the same goals. Now everyone is asking: can Apple’s HomeKit and Siri manage SmartThings?
Unfortunately, there is no simple way to integrate Samsung SmartThings with HomeKit, so you may use Siri to manage the former. However, connecting SmartThings to Apple’s HomeKit is possible with the help of a third-party app called HomeBridge.
We will use Apple’s HomeKit and the HomeBridge platform to demonstrate how to connect SmartThings to your iOS device. What is Homebridge, and how does it help to bridge the gap between Apple HomeKit and Samsung SmartThings, two of the most popular smart home helpers available today? So, let’s not waste any time and get started.
| Method | Ease | Cost | Siri Voice Control | Requires External Bridge |
|---|---|---|---|---|
| SmartThings Matter (Native) | ✅ Very Easy | Minimal/Free | ✅ Yes | ❌ No |
| AddToHomeKit | ✅ Easy (guided) | Low | ✅ Yes | ✅ Yes (via cloud or device) |
| HOOBS (GUI Homebridge) | Medium | Low (Raspberry Pi cost) | ✅ Yes | ✅ Yes |
| Homebridge (Manual) | Advanced | Variable | ✅ Yes | ✅ Yes |
SmartThings to HomeKit Integration Comparison: HOOBS vs Homebridge vs ATH Bridge vs AddToHomeKit:
| Feature | AddToHomeKit | ATH Bridge (AddToHomeKit Hub) | HOOBS (Homebridge Out of the Box) | Homebridge (Manual) |
|---|---|---|---|---|
| Ease of Setup | ✅ Step-by-step cloud onboarding | ✅ Plug-and-play with minimal effort | ⚠️ Requires basic networking/UI understanding | ❌ CLI-based setup, for advanced users |
| HomeKit Compatibility | ✅ Seamless iOS integration | ✅ Native HomeKit bridging | ✅ Full Siri & Home app control | ✅ Full Siri & Home app control |
| SmartThings Integration | ✅ Official plugin supported | ✅ Auto-discovers Zigbee/Matter devices | ✅ Requires manual SmartThings plugin setup | ✅ Full customization via SmartThings plugin |
| Supported Devices | Most HomeKit + select cloud-connected devices | ✅ Zigbee, Z-Wave, Matter via ATH hardware | ✅ Huge plugin library across ecosystems | ✅ Max flexibility—any plugin or custom JSON config |
| Plugin Library | ❌ Closed ecosystem, limited plugins | Growing list, limited customization | ✅ 2,000+ plugins via UI | ✅ 2,000+ plugins via CLI or UI |
| Customization Level | ❌ None – user-friendly only | Some customization via dashboard | ✅ Plugin settings UI available | ✅ Advanced config files and scripts |
| Platform Requirements | Cloud-only (no Raspberry Pi needed) | ⚙️ Requires ATH device (mini hub) | Runs on Pi, macOS, Windows, Docker | Runs on Pi, macOS, Linux, Docker |
| Power Consumption | ♻️ Zero – cloud hosted | ✅ Ultra low power hardware | Low (Pi or local computer always-on) | Low (depends on your setup) |
| Security & Privacy | ✅ Cloud encrypted, no local access needed | ✅ Local control with cloud fallback | Depends on user configuration | Depends on firewall & manual config |
| Cost | Subscription model | One-time ATH Bridge device cost | Free, with optional Pi/device | Free, but may require Raspberry Pi or NAS |
| Best For | ✅ Beginners wanting no-code cloud integration | ✅ Users who want plug-and-play smart home bridging | ✅ Tech-savvy users wanting UI with flexibility | ✅ Developers, tinkerers, full control fans |
Smart Things Setting Up:


What Is Homebridge?
Homebridge is a small, lightweight NodeJS server that sits between your home network and your gadgets, acting as a middleware platform and relaying signals from HomeKit. When you utilize Homebridge, your Apple HomeKit may communicate with third-party systems like Samsung SmartThings that don’t support HomeKit out of the box using the iOS HomeKit API.
Setting up a Homebridge server is the first step in integrating HomeKit with Samsung SmartThings. Once your HomeBridge server is up and running, you may acquire access to SmartThings by installing the corresponding plugin.
All Apple HomeKit devices are supported by Siri. Since SmartThings have been connected with HomeKit, utilizing Homebridge will allow you to command them using Siri.
| Feature | Homebridge (Manual Setup) | HOOBS (Easy Setup) |
|---|---|---|
| Skill Level Required | Advanced (Coding/Terminal) | Beginner-Friendly |
| Ease of Plugin Install | Manual via config.json | One-click install |
| Maintenance | Manual updates | Auto plugin and system updates |
| UI Design | Basic | User-friendly dashboard |
| Best For | Tech-savvy users & developers | DIY home users / non-tech folks |
How can I start Homebridge?
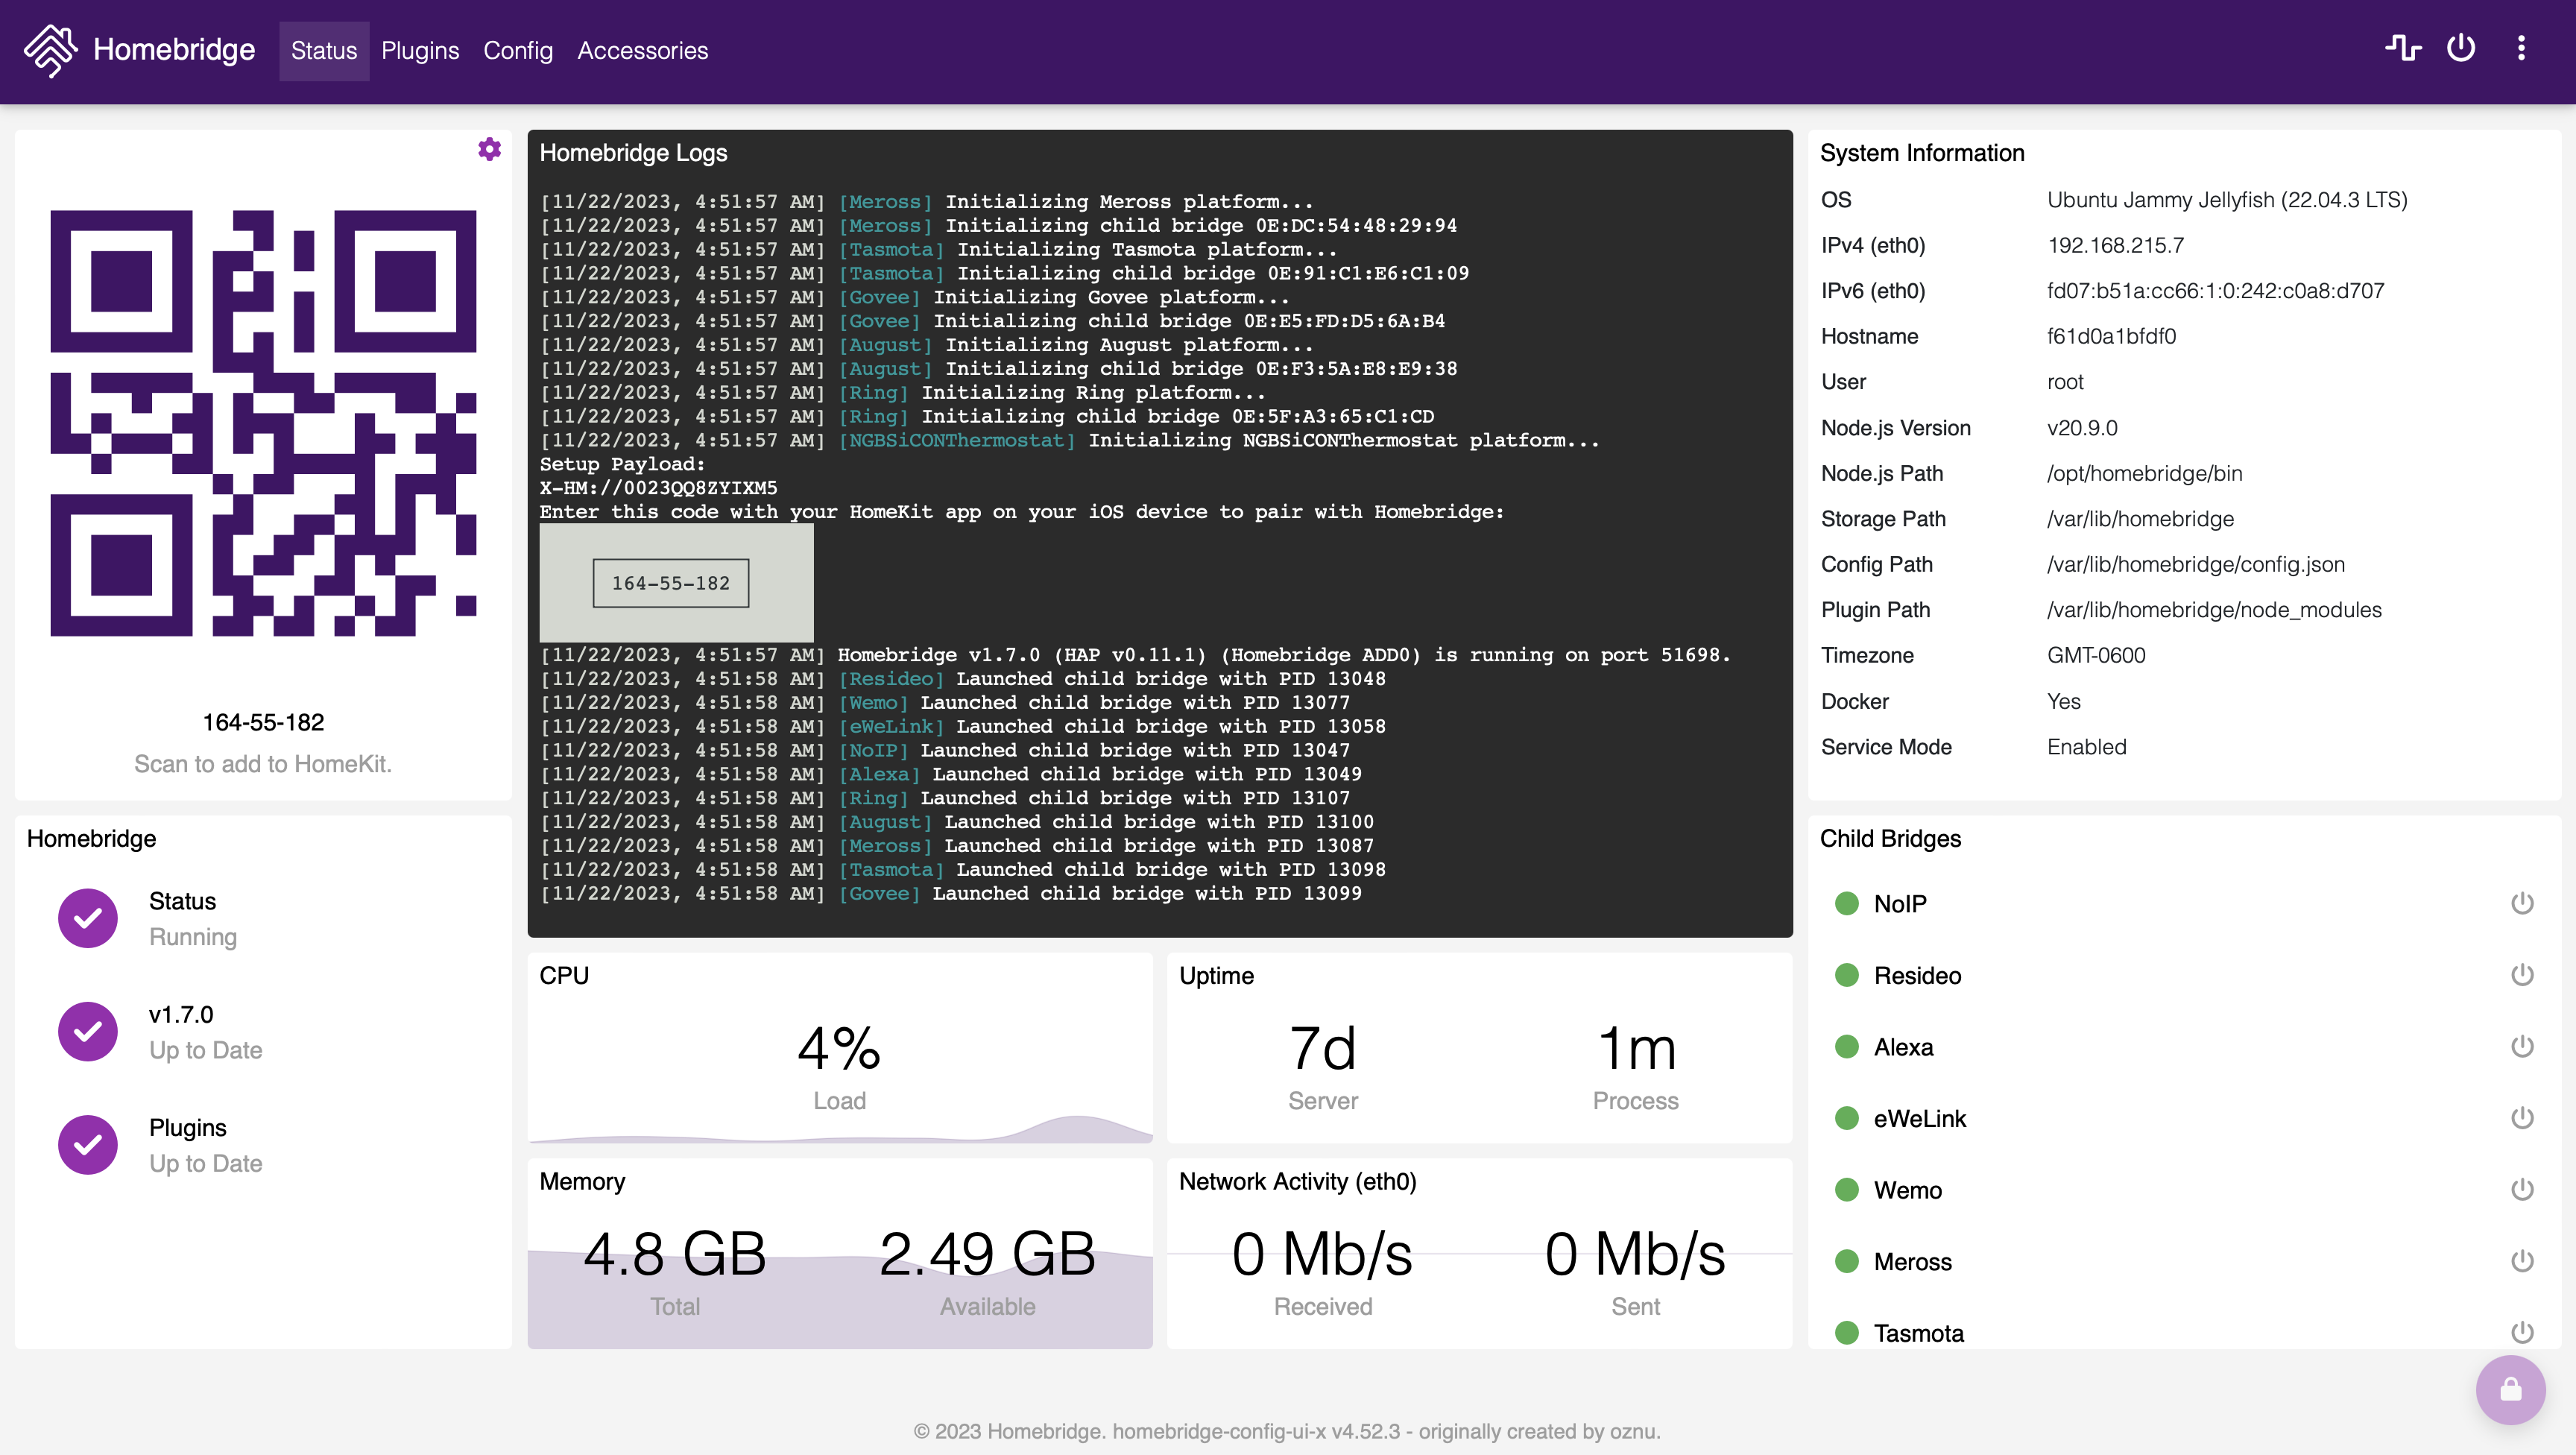
Because HomeBridge is software, a computer is required to execute it. Homebridge is compatible with several OSes and hardware configurations. If you want the most up-to-date installation instructions for the platform you want to use with HomeBridge, check out this page on the HomeBridge Wiki.
HomeBridge must always be active to maintain a connection with SmartThings and HomeKit. Having Homebridge installed on your computer necessitates that it be on at all times. This is a significant problem for computers since they need more energy. Raspberry Pi is my first choice because of its low power consumption.
The HomeBridge Out of the Box System, or HOOBS for short, is a great option if you’re not very computer savvy. The gadget provides a wide variety of useful functions. For starters, it streamlines the installation process.
| Step | Description | My Personal Insight | Pro Tips |
|---|---|---|---|
| 1. Choose Your Method | Decide whether you’ll use Homebridge manually or go with HOOBS for an easier setup. | I chose HOOBS because it saved me hours of command-line headaches. | For beginners, HOOBS is plug-and-play. Advanced users can use Raspberry Pi with Node.js for flexibility. |
| 2. Set Up HOOBS | Connect HOOBS to your Wi-Fi/router, access the dashboard, and create an admin account. | The web interface is clean and very beginner-friendly. | Use Ethernet for a more stable connection during setup. |
| 3. Enable GitHub Integration in SmartThings | Log into the SmartThings IDE and enable GitHub integration to access custom SmartApps. | This step took the most time due to outdated docs—follow tutorials carefully. | Be patient with GitHub auth—sometimes you need to refresh the page or re-authenticate. |
| 4. Create a Custom SmartApp | Use the IDE to paste code for the SmartThings SmartApp, then save and publish it. | I copied my code from the official Homebridge SmartThings GitHub repo. Worked smoothly. | Always activate OAuth after adding the app or it won’t link properly to Homebridge. |
| 5. Install SmartThings Plugin in HOOBS | In HOOBS, search for homebridge-smartthings-v2 and install the plugin. |
The plugin was installed in 1 minute without issues. | Always check the plugin docs inside HOOBS after install—they’re usually well-maintained. |
| 6. Get SmartThings Token and App ID | From SmartThings IDE, generate a personal access token and app ID for the Homebridge plugin. | I stored mine in a secure notes app—losing it resets the whole setup. | Use a password manager to store these keys safely. Don’t share or expose them publicly. |
| 7. Add Plugin Details in HOOBS | Paste your token and App ID into the plugin config area in HOOBS. | The UI made it really easy to paste everything without errors. | Restart HOOBS after saving changes—most issues are fixed by a simple reboot. |
| 8. Test Device Visibility | Check that your SmartThings devices now appear in the Apple Home app. | It was exciting to see my Samsung sensors in the Apple ecosystem! | If devices don’t appear, check for typos in plugin config or verify OAuth is active. |
| 9. Start Using Siri | Say commands like “Hey Siri, turn on the hallway light” to confirm integration is working. | Siri instantly picked up my SmartThings-connected light switch. | Test with multiple devices to confirm full sync. Rename them in Home app for easier control. |
| 10. Automate Routines (Bonus) | Create HomeKit automations using triggers from your SmartThings devices (e.g., motion, temperature). | I created a bedtime routine that turns off lights + lowers thermostat from Siri command. | Combine HomeKit + SmartThings to build powerful cross-platform automations. |
Besides that, no coding experience is necessary. The HOOBS system handles everything, from installing and configuring plugins to providing support for cutting-edge plugins and periodic updates. This makes it ideal for use with third-party intelligent home automation systems.
But here’s a question: how exactly does HOOBS make it such that HomeKit and SmartThings can work together without any hitches?
| Feature | Samsung SmartThings | Apple HomeKit | With Homebridge Integration |
|---|---|---|---|
| Native Compatibility | ✔ | ✔ | ❌ (Needs Homebridge) |
| Voice Assistant | Google Assistant, Alexa | Siri | Siri (via Homebridge) |
| Zigbee/Z-Wave Support | ✔ (via SmartThings Hub) | ❌ | Partial (depends on plugin) |
| Local Automation | ✔ | ✔ | ✔ (if Homebridge is local) |
| Platform Openness | Android & iOS | iOS only | Requires technical setup |
Complete Setup Walkthrough: HomeKit + SmartThings via HOOBS
Setting Up HOOBS With HomeKit and SmartThings
| Feature | Apple HomeKit | Samsung SmartThings | Combined with Homebridge |
|---|---|---|---|
| Voice Control (Siri) | ✔ | ❌ | ✔ |
| Cross-brand Compatibility | Limited | Wide (Zigbee/Z-Wave) | ✔ Best of Both |
| iOS Integration | ✔ Native | Basic App | ✔ Enhanced via plugin |
| Automation & Scenes | ✔ | ✔ | ✔ Unified |
The first step in configuring your Homebridge hub is to link it to your local area network (LAN), wireless network, or router. The next step is to sign up for HOOBS as an administrator. To learn more about creating an account, please read on. Installing SmartThings is the next step after creating your administrator account. I’m curious whether you’re a SmartThings user and if you’ve enabled GitHub integration. If you haven’t already, start there.
Once the integration has been activated, it’s time to adjust the parameters. Using the integrated development environment (IDE), you may log in to your SmartThings account. To pick your device’s location, open the Settings app and tap the “My Location” option.
In addition, choose My SmartApps if you want to install the app manually. In this area, you’ll see the “+New SmartApps” button; you can enter your app’s code after clicking it. Then, you can manually install the new SmartApps by clicking the Create option. Then, go to the SmartApps settings and activate OAuth there. Once satisfied with the configuration, click “Publish” to complete the setup.
My Experience:
When I first set up my smart home, I had Alexa, Siri, and SmartThings all running separately. The frustration peaked when I couldn’t use Siri to control devices connected to SmartThings. After days of trial-and-error, HOOBS made my life easy. I now control my Zigbee bulbs, Ring doorbell, and even my old garage opener using Siri—all thanks to this integration.
Now is the time to set up SmartThings for compatibility with Apple’s HomeKit. Simply choose SmartApps from the SmartThings app library to get started. The next step is to set up your SmartThings application inside the Homebridge V2.
The next step is to create your app’s unique identifier, URL, and token. The next step is to check the HOOBS screen for a list of necessary plugins for the integration. The next step is to use Home Bridge Smart Things v2 to install the plugins, after which the previously created data may be added. Now you may begin utilizing Siri to manage your SmartThings setup.
FAQS
Can HomeKit and Siri Control Smart Things?
Siri makes it simple to keep tabs on and operate your Samsung SmartThings devices inside your Apple Home. This enables you to manage your connected devices from afar and see their current status in real-time.
Can only Samsung devices use SmartThings?
Although there are some functional differences between Samsung and non-Samsung devices, the SmartThings app may be used to operate SmartThings hardware and compatible devices on Android and iPhone platforms.
Is ZigBee supported by SmartThings?
The SmartThings Hub has inbuilt Z-Wave and ZigBee radio antennas to connect wirelessly with Z-Wave and ZigBee devices. Regarding Z-Wave and ZigBee networks, the Hub oversees most of the action.
What is the function of Aeotec?
The Aeotec Smart Home Hub is an all-in-one solution for creating a fully customized smart home, from the audio and security systems to the lighting and heating. You may link up to 100 other Zigbee-compatible gadgets to the Hub. You may link up to one hundred Z-Wave devices to the Hub. Allows S2 Security.
Does Aeotec’s hub function similarly to SmartThings’?
The Aeotec Smart Home Hub is identical to the Samsung SmartThings Hub V3 except for the Aeotec name. That’s because the only change between the two devices is that the Hub is now made by Aeotec instead of Samsung.
-
 Guides2 years ago
10 Best Apps To Control All Your Smart Home Devices.
-
 Gadgets3 years ago
Does Nest Thermostats Contain Cameras Or Microphones? Is It Safe For you?
-
 Gadgets3 years ago
What Is The Purpose Of Red Button On The SimpliSafe Keypad?
-
 Gadgets3 years ago
Complete Guide About Equalizer settings for Samsung-Soundbar
-
 Accessories2 years ago
Blink Camera’s Temperature Sensor Settings, and More
-

 Accessories2 years ago
Can Siri Control Samsung Televisions And Are Samsung TVs Homekit Compliant?
-

 Gadgets3 years ago
Fitbit Symbols Meaning: What Do The Fitbit Icons Mean?
-

 Accessories2 years ago
Can Ring Cameras and Other Ring Devices Be Connected to Multiple Networks?

