
Guides
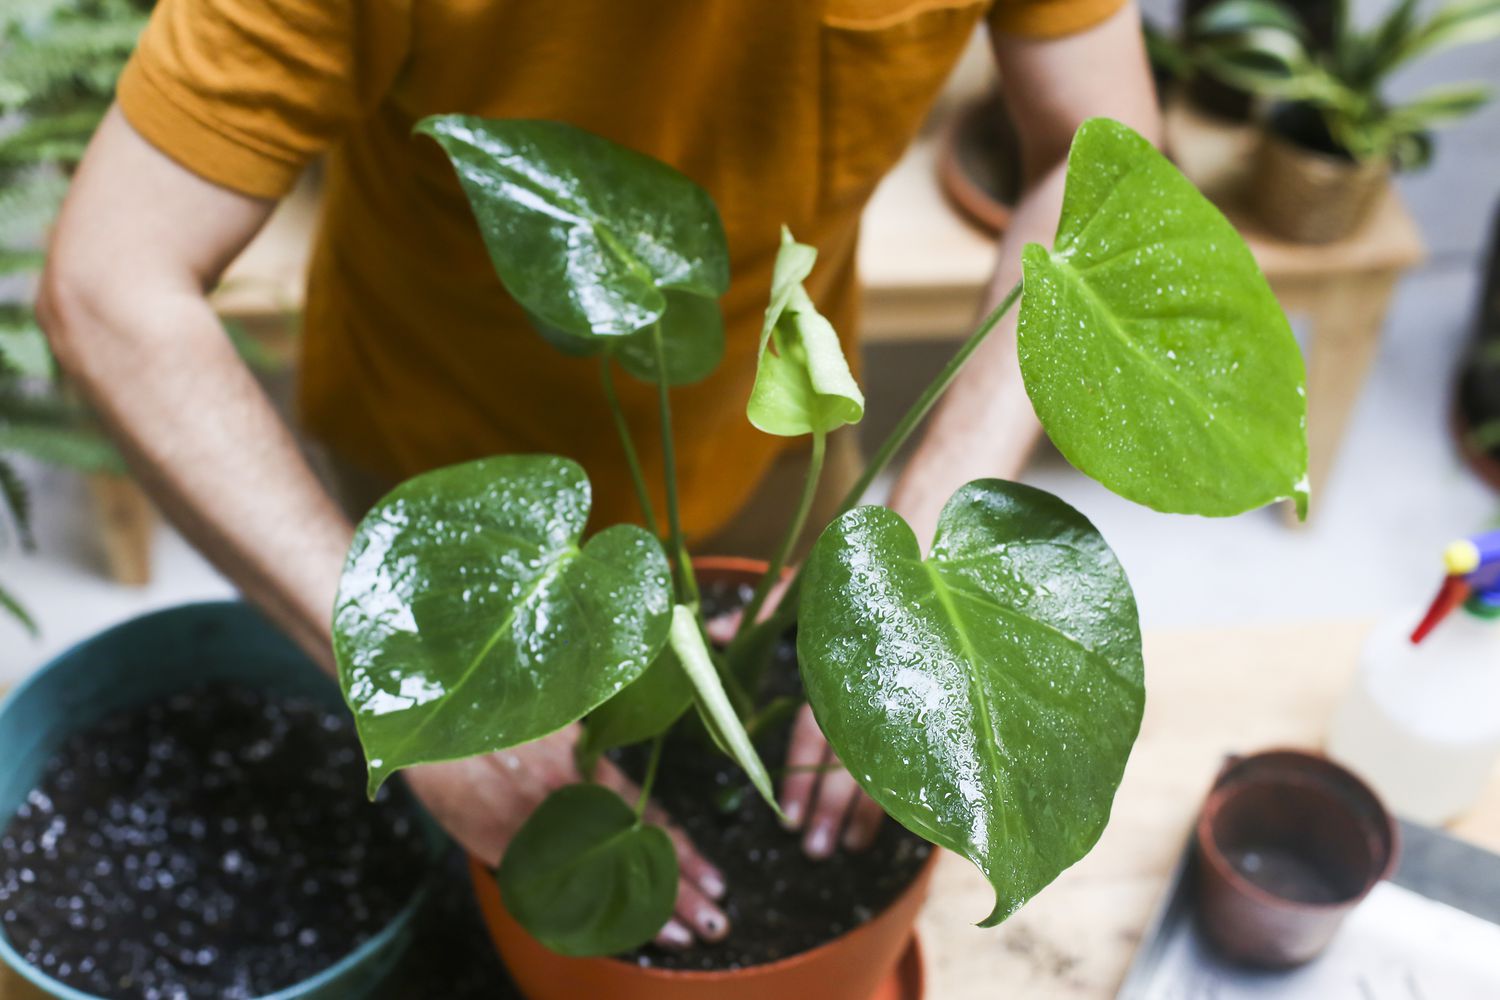
Mastering Monstera Potting: Complete Guide
Introduction
Potting a Monstera plant correctly is the foundation of its health, growth, and longevity. These tropical plants are known for their striking leaves and unique aesthetic, but they can only thrive when given the proper environment, soil, and care. Potting is not just about transferring the plant to a bigger container; it involves understanding the plant’s root structure, drainage needs, soil composition, and optimal conditions for growth. Whether you are repotting an overgrown Monstera or planting a young one for the first time, mastering the potting process ensures your plant develops strong roots, vibrant foliage, and long-term vitality.
This article offers a detailed, step-by-step guide to potting Monsteras, covering everything from choosing the right pot and soil mix to watering techniques, post-potting care, and troubleshooting common problems. By following these guidelines, your Monstera will flourish and remain a stunning addition to your home.
Understanding Monstera’s Needs
1. Choosing the Right Pot
The first step in potting a Monstera is selecting an appropriate container. A pot should be slightly larger than the plant’s current one, providing enough room for root growth without retaining excessive moisture. Monsteras are prone to root rot if their soil stays soggy, so always choose a pot with adequate drainage holes. The material of the pot also matters: terracotta pots are excellent for air circulation, while plastic pots retain moisture longer, which can be useful in drier environments.
2. Preparing the Soil Mix
Monsteras prefer well-draining soil that retains moderate moisture. A mix of potting soil, perlite, and orchid bark works well, providing aeration and mimicking their natural tropical habitat. Avoid heavy, clay-based soils, as they can retain too much water, suffocating roots. The right soil mix ensures your Monstera’s roots get enough oxygen while staying hydrated.
3. Watering Before Potting
Watering your Monstera a day or two before repotting reduces transplant shock. Moist soil holds its shape better during the transfer and protects delicate roots from breaking.
Step-by-Step Potting Guide
Step 1: Select the Right Time
Repot your Monstera during its growing season—spring or early summer. During this time, the plant is actively developing roots and foliage, which helps it recover quickly from the stress of repotting. Avoid repotting during the winter or dormant months, as the plant’s growth slows, making it more vulnerable.
Step 2: Prepare the New Pot
Start by placing a layer of your prepared soil mix at the bottom of the new pot. This provides a supportive base for the roots and ensures good drainage. If the pot is deep, consider adding a small layer of pebbles at the very bottom to enhance drainage further.
Step 3: Remove the Monstera from Its Current Pot
Gently slide the plant out of its existing container. If the roots are densely packed, carefully loosen them with your fingers, avoiding excessive damage. Inspect the roots for any signs of rot or disease, and trim away unhealthy sections. Healthy roots are firm and white, while brown or mushy roots indicate problems that need attention.
Step 4: Position the Plant in the New Pot
Place your Monstera in the center of the new pot, ensuring it sits at the same soil depth as before. Fill around the roots with your soil mix, pressing lightly to remove air pockets. Avoid compacting the soil too much, as roots need space to breathe and expand.
Step 5: Water Thoroughly
Water the plant immediately after potting to help settle the soil around the roots. Make sure excess water drains freely to prevent waterlogging, which can lead to root rot.
Step 6: Provide Proper Lighting
After potting, place your Monstera in bright, indirect light. Direct sunlight can scorch its leaves, while too little light slows growth. A spot near a north- or east-facing window usually works best.
Post-Potting Care
1. Monitor Watering
Let the top inch of soil dry out before watering again. Overwatering is a common mistake and can harm your Monstera. Stick to a consistent watering schedule and adjust based on the plant’s environment and season.
2. Provide Humidity
Monsteras thrive in humid conditions, similar to their native tropical habitats. Increase humidity by using a humidifier, placing the pot on a tray filled with water and pebbles, or grouping it with other plants. Regular misting also helps, but avoid leaving leaves wet for long periods to prevent fungal issues.
3. Fertilize Regularly
During the growing season, feed your Monstera every 4-6 weeks with a balanced, water-soluble fertilizer. This promotes strong leaf development and healthy growth. Avoid fertilizing during dormancy, as the plant will not utilize the nutrients efficiently.
Troubleshooting Common Issues
Yellowing Leaves
Yellow leaves often indicate overwatering, poor drainage, or nutrient deficiencies. Check the soil’s moisture and drainage and adjust watering habits. Fertilizing appropriately can also restore leaf color.
Wilting
Wilting can result from underwatering or root rot. Examine the soil and roots to identify the issue. If roots are healthy and the soil is dry, increase watering. If roots are damaged or mushy, trim affected parts and repot with fresh soil.
Stunted Growth
Slowed growth may indicate that the Monstera is root-bound or lacks nutrients. Repotting into a slightly larger pot and fertilizing can rejuvenate the plant. Ensure it receives adequate light and humidity.
Read More: Why You See “You Have Been Blocked Originating Messages
Conclusion
Potting a Monstera is a critical step for ensuring its long-term health and vibrancy. By choosing the right pot, preparing a well-draining soil mix, and carefully following potting procedures, you can create an ideal environment for your plant to thrive. Post-poting care, including proper watering, providing humidity, and regular fertilization, further supports robust growth and beautiful foliage. Monitoring for common issues such as yellowing leaves, wilting, or stunted growth allows you to address problems early and maintain a healthy plant. A well-potted Monstera not only enhances the aesthetic of your home but also contributes to better air quality and a sense of tranquility.
With consistent care and attention to detail, your Monstera can grow into a stunning tropical centerpiece, reflecting your dedication and knowledge as a plant caretaker. Proper potting is the first step in a rewarding journey of nurturing one of the most popular houseplants worldwide.
FAQs
1. How often should I repot my Monstera?
Repot your Monstera every 1-2 years, depending on its growth. Signs it needs repotting include roots coming out of drainage holes or the plant becoming top-heavy.
2. Can I use regular potting soil for my Monstera?
Standard potting soil can work, but it’s best to mix it with perlite and orchid bark to improve drainage and mimic its natural environment.
3. Should I trim the aerial roots of my Monstera?
Trimming aerial roots is optional. They help the plant absorb moisture and nutrients from the air but can be trimmed for aesthetic reasons.
4. How can I increase humidity for my Monstera?
Use a humidifier, a water and pebble tray, mist the leaves occasionally, or group it with other humidity-loving plants to boost humidity levels.
5. What should I do if my Monstera’s leaves are turning brown?
Brown leaves are usually caused by underwatering, low humidity, or direct sunlight exposure. Adjust watering habits, increase humidity, and move the plant to a location with indirect light.


Does TextNow Show Your Name?
Introduction In today’s digital age, maintaining privacy while communicating is paramount. TextNow, a popular VoIP service, offers users the ability...


Mastering Monstera Potting: Complete Guide
Introduction Potting a Monstera plant correctly is the foundation of its health, growth, and longevity. These tropical plants are known...


Why You See “You Have Been Blocked Originating Messages
Introduction Few things are more frustrating than trying to send an important text, only to see the notification: “You have...


G15Tools.com Gadget Review: Honest Insights for Everyday
Introduction Technology is moving faster than ever, and for many people, keeping up with the latest gadgets can feel overwhelming....


Boylecheloid Flower: Myth, Symbolism, and Possible Reality
Introduction The Boylecheloid Flower has sparked curiosity in recent years. Described as a rare bloom with spiral petals, shifting colors,...


5StarsStocks.com Review: Is It Really Worth Your Investment?
Introduction Stock investing is no longer reserved for Wall Street professionals. With the rise of AI-driven platforms, even beginners can...


How to Contact DesignMode24.com Easily
Introduction DesignMode24.com is a popular online platform known for delivering high-quality content on design, technology, lifestyle, and home improvement. Many...


Roslyn Falco: The Untold Story of the ‘Son of Sam’s’ Half-Sister
Introduction Roslyn Falco is a name that often surfaces in discussions about David Berkowitz, the infamous serial killer known as...


Whether Or Not A Subscription Is Needed To Use Blink Mini?
Blink makes interior, plug-in security cameras that may work with or without a subscription. Here is a brief tutorial on...

What’s The Difference Between Ecobee Smart Sensor Vs Room Sensor?
Comparing the Ecobee Smart Sensors to the Room Sensors reveals many key differences. One is a simple room sensor, as...


How to Build an Integrated Smart Home Security System for Any Home?
Smart home security isn’t about stacking gadgets. It’s about designing a simple, layered system that deters intruders, detects problems quickly,...


How to Maximize a Home’s Potential with Smart Architecture?
Designing a home today is about more than picking countertops and paint colors. It’s a sophisticated process that prioritizes both...


Cooling System Problems Every Homeowner Should Know About
There’s nothing like a scorching summer day to remind you how much you rely on your cooling system. When it...


The Complete Guide to Maintaining Your Home’s Hot Water System
Few household frustrations compare to turning on the shower and being greeted by icy water instead of comforting warmth. Your...

How to Keep Your Home Warm in Winter Without Raising Energy Costs?
Winter can be cozy, but it also brings a familiar challenge: how do you stay warm without sending your energy...


How Smart Tech Can Help You Sell Your Home for More?
Selling a home is a major milestone, and in today’s market, buyers are looking for more than just square footage...


Can Lutron Caseta Work With Google Home? Setup, Commands, and Troubleshooting
Compared to other digital helpers on the market, Google Assistant ranks well. It is capable of regulating almost everything. When...


Can You Use Google Nest Mini Without WiFi? Bluetooth Setup & Offline Features Guide
The Google Nest Mini integrates the Google Assistant seamlessly, allowing it to do many useful tasks. However, access to the...

Can I Watch My Ring Camera on My TV? LG, Samsung, Firestick Setup & Solutions Explained
The question may arise for those who possess a Ring brand doorbell camera as to whether or not the broadcast...


Can HomeKit and Siri Control SmartThings?
Smart light bulbs and a smart television are usually the first smart home upgrades. Of course, that’s not the end...


If I Unblock Someone on iMessage, What Happens?
In today’s global world, it is necessary to stay in touch with friends, family and colleagues. Apple IMessage service is...


How Smart Pool Cleaners Integrate with Home Automation Systems?
In today’s smart home world, the robot pool cleaner is no longer a utility device but rather is now a smart,...


What Causes an Electric Motor to Hum and not work
One of the most common machines is those that are powered by electric motors. At times, however, these motors can...


How to Find Your Verizon Account Number
Introduction So Verizon is a popular messaging service and calling app that provides the option of free call and phone...


How to Delete Read-Only Contacts: Android & iphone
Introduction It is simple to delete read-only contacts on the Android and iPhone but a question arises here: how can...


How to Find Saved Videos on My Phone
Introduction Nowadays the integral part of our life is the mobile phone. We create so many memories everyday and store...


You Can’t Message This Account: Messenger Fixed
Introduction Facebook messenger is one of the most popular messaging apps globally to connect with other people throughout the world....


Delete Text Messages on iPhone for Both Sides
Introduction It is simple to delete messages on the iPhone but a question arises here: how can we delete messages...


Why Won’t My Call Go Through to a Certain Number?
Introduction In today’s fast-paced world, staying in touch with everyone is important. For this purpose, we use our phone to...


Call Ends Immediately After Dialing on Android
Introduction In today’s fast-paced world, staying in touch with everyone is important. For this purpose, we use our phone to...


What Is Logitech Download Assistant?
Logitech is famous throughout the world for their amazing computer accessories including mouse, keyboard and headsets. These devices come with...


Does a Canceled Call Go Through on iPhones?
Introduction In today’s digital world there are new and exceptional ways for connecting with each other. Communication has also evolved...


How to Create an INI File on Windows, Mac, Android
Introduction The files that are used to store settings and configuration for the software application are known as INI files....


How Long Do AirPods Take to Charge from Dead?
Airpods Pro are one of the best and most popular airbords that are wireless and available in the market nowadays....


PS4 Controller Charging but Not Connecting
Introduction Many people play PS4 games nowadays but sometimes they encounter a frustrating issue which is that their controller is...


How to Fix IMS Registration Status Not Registered
Introduction IMS stands for IP multimedia system which is present in carrier rn smartphones that play a crucial role in...


Rythm Discord Bot: What It Is and How to Use It
Introduction Discord has been extremely popular nowadays aur communication among gamers technicians and other communities that want to stay connected...


Where Is the Volume Button on a Vizio TV
Introduction It is easy to find the volume button on the Vizio TV but it can be difficult for a...


Numbers to Call to Pretend You Are on the Phone
Introduction There are always some moments in everyone’s life where pretending to be on the phone can save us from...


What Is the Quickstep App: A Complete Review
Introduction In today’s world we manage everything with our mobile phone. It is important to have a mobile phone and...

Do Smart Plugs Use Alot Of Electricity?
In addition to the fact that they are more convenient, smart plugs are intended to help you save money by...


How to Adjust The Temperature On ECOBEE Smart Thermostat?
The Ecobee Smart Thermostat is an advanced piece of equipment that can effectively substitute for your old thermostat. It may...


Top Cheap Gaming Monitors On A Budget
Introduction It is difficult to find a gaming monitor that is affordable and also of great quality. But today the...


Subscriber You Have Dialed is Not in Service
Introduction In today’s fast-paced world, staying in touch with everyone is important. For this purpose, we use our phone to...


What to Do if Spectrum Internet Keeps Dropping, Cutting, Going Out
Introduction It is easy to find the dropping, cutting, going out problem on the Spectrum internet but it can...


How to Sign Into iMessage on iPhone
Introduction In today’s global world, it is necessary to stay in touch with friends, family and colleagues. Apple IMessage service...


The Top 10 Belts for Ab Exercises
You will need to follow a regimented eating plan and training program to get abs like a washboard. However, in...


10 Best Smart Plugs For SAMSUNG Smart Things.
Smart plugs have the potential to have a major effect homes beyond initial expectations. These devices are engineered to enhance...


How To Link An Older Bose Sound System To A Newer Television?
Bose systems are used in the development of high-quality sound systems as well as portable electronic gadgets. Many different Bose...


10 Best Apps To Control All Your Smart Home Devices.
10 Best Apps To Control All Your Smart Home Devices are the kinds of smart home gadgets that used to...


Smartwatch Features: A Comprehensive Overview of Their Capabilities
Trying to choose the perfect smartwatch may be a daunting task, as you’ll want to find one that satisfies your...


Are Smart Locks Hard To Install Find Out Here?
There are several compelling reasons why installing smart locks in a home may be a very worthwhile investment. You won’t...


10 Most Cutting-Edge TVs with Touch Screens
A touch screen TV is a kind of television that can be controlled by touching the screen. This cutting-edge innovation...


How Many Smart Devices Can You Connect To Alexa?
The more gadgets you connect to Alexa, the higher your home’s intelligence will be. Connecting Alexa-enabled smart home devices like...


How To Make Smart Bathroom By Using 5 Gadgets?
The world we live in is completely immersed in advanced technology. Technology makes life simpler in every aspect, from cellular...

Interesting Things About Ecobee Firmware Upgrades.
All smart devices, including smart thermostats, need periodic software upgrades. Firmware is the term used to describe the software that...


What Is Lg Tv Plus And How Its Works And How To Connect To Tv?
When it comes to Smart TVs, LG is a top contender. The two most common brands of televisions are LG...


The Most Effective Fitbit Blood Pressure Monitors
There should be no wiggle space when it comes to the performance and quality of a blood pressure monitor because...


7 Best WIFI Routers For Your Smart Home
With the growth of home automation systems, a stable router that can connect and control these devices efficiently has become...


8 Benefits Of Smart Bulbs Around The House.
Every smart light comes with its own unique set of limitations, and not all of them are capable of carrying...
-
 Gadgets2 years ago
Does Nest Thermostats Contain Cameras Or Microphones? Is It Safe For you?
-
Guides1 year ago
10 Best Apps To Control All Your Smart Home Devices.
-

 Gadgets2 years ago
What Is The Purpose Of Red Button On The SimpliSafe Keypad?
-

 Gadgets2 years ago
Complete Guide About Equalizer settings for Samsung-Soundbar
-
 Accessories2 years ago
Blink Camera’s Temperature Sensor Settings, and More
-

 Solutions3 years ago
Why is My Samsung TV Picture So Dark? Exploring the Possible Causes
-

 Gadgets3 years ago
Fitbit Symbols Meaning: What Do The Fitbit Icons Mean?
-

 Accessories2 years ago
Can Siri Control Samsung Televisions And Are Samsung TVs Homekit Compliant?